
 Designer Series Paper")


Here is a free Tutorial of how to create this fold card. I hope it inspires you and you will share yours.
Tag me if you do 😁

Stampin’ Up! Supplies:
- STAMPS – Any stamps you have, I used In The Moment and Waves of Inspiration
- PAPER – Basic White Thick Cardstock (159229), Waves Of Inspiration Designer Series Paper, Basic White Cardstock (159276)
- INK PAD – Gorgeous Grape, Black Momento, Soft Suede, Watercolor pencils
- OTHER – Paper Trimmer (152392), Stamparatus (146276), Simple Shammy (147042), Clear Block Bundle (118491), Multipurpose Liquid Glue (110755) Tear n Tape, Bone tool
Cutting & Scoring: the base
- Basic White Thick Cardstock - 8” x 5 ½”, score and fold at 3”, 6” & 7”
- Basic White Cardstock - 3” x 6” score at 4¼”
Cutting & Scoring: the layers
- Designer Series Paper – 2 ¾” x 5 ¼”, ¾” x 5 ¼”
- Basic White – 2 ¾” x 4“ (top piece)
Instructions:
- Stamp images and sentiments on the top piece and color the lady. I used the Layering Diorama Dies to give her shape. You can add any stamps you want to the front.
- Add two DSP layers to the base with multipurpose glue.
- Add tear n tape to the 3” x 6” and adhere the shorter side to the back of the base, it helps to fold the base flat first
- Adhere the top piece to the front
- Add any embellishments like coordinating ribbon or gems.
This diagram below uses the colored Cardstock for the 2 base pieces, you can add more layers by cutting ¼“ smaller piece then the base. I learned this card layout from Linked by Ink teammates Ann Coffey and Debbi Hill.

Here is a free Tutorial of how to create this fold card. I hope it inspires you and you will share yours.
Tag me if you do 😁
Stampin’ Up! Supplies:
- STAMPS – Any stamps you have, I used In The Moment and Waves of Inspiration
- PAPER – Basic White Thick Cardstock (159229), Waves Of Inspiration Designer Series Paper, Basic White Cardstock (159276)
- INK PAD – Gorgeous Grape, Black Momento, Soft Suede, Watercolor pencils
- OTHER – Paper Trimmer (152392), Stamparatus (146276), Simple Shammy (147042), Clear Block Bundle (118491), Multipurpose Liquid Glue (110755) Tear n Tape, Bone tool
Cutting & Scoring: the base
- Basic White Thick Cardstock - 8” x 5 ½”, score and fold at 3”, 6” & 7”
- Basic White Cardstock - 3” x 6” score at 4¼”
Cutting & Scoring: the layers
- Designer Series Paper – 2 ¾” x 5 ¼”, ¾” x 5 ¼”
- Basic White – 2 ¾” x 4“ (top piece)
Instructions:
- Stamp images and sentiments on the top piece and color the lady. I used the Layering Diorama Dies to give her shape. You can add any stamps you want to the front.
- Add two DSP layers to the base with multipurpose glue.
- Add tear n tape to the 3” x 6” and adhere the shorter side to the back of the base, it helps to fold the base flat first
- Adhere the top piece to the front
- Add any embellishments like coordinating ribbon or gems.
This diagram below uses the colored Cardstock for the 2 base pieces, you can add more layers by cutting ¼“ smaller piece then the base. I learned this card layout from Linked by Ink teammates Ann Coffey and Debbi Hill.

I am sharing in the challenge in Kylie's International Blog Highlights where the theme is "Thank You", and projects voted in the top 10 go on to participate in Kylie's Winners Highlights Hop later in the month. Don't forget, voting is only open for one week and I would love it if you could pop on over to Kylie's blog to vote for me - I am listed at #27, and while there, vote for your other four favorite cards. Click the below button to head over to Kylie's blog:

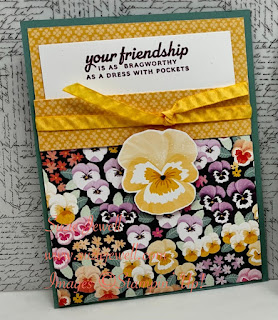
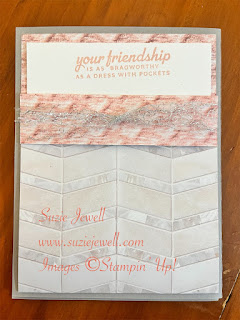
I was so inspired by Karen Titus’s Pocket card. I found it fun to use up some patterned paper I had stashed. I loved how easy these were to put together! If you place an order with me this month using the host code Posted to the right I will send you a version of this pocket card!
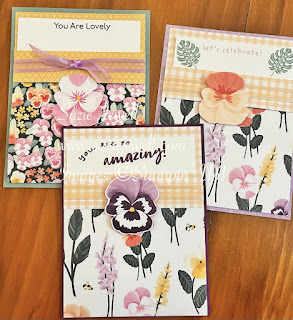
The pretty pansy’s made the cut too with Soft Succulent, Rich Razzleberry and fresh freesia cardstock, matching the Fresh Freesia and Pale Papaya ribbon
I cut out some pansies from the patterned paper for a pop up accent.
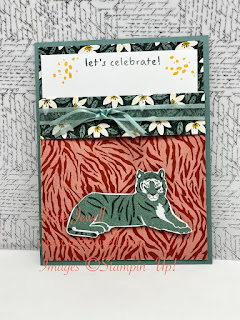
This card I used In The Wild patterned paper, Soft Succulent cardstock and ribbon. I fussy cut out the tiger. The sentiment is stamped in soft succulent.
This card I used In good taste and Smoky Slate cardstock with Metallic Mesh ribbon and blushing bride stamp pad.
Measurements to cut:
Patterned paper : 4” x 10 1/4”, score at the top 1” and 5”
Base colored cardstock: 4 1/4” x 5 1/2”
Basic white at 3 3/4” x 5”
Idea Pin on Pinterest
Shop for the products here:
Product List 
 Open Weave Ribbon")
 Designer Series Paper")

 Open Weave Ribbon")


 Open Weave Ribbon")


Easy Pocket Card Fun Fold / March 2022 Kylie's International Blog Highlights Contest
Monday, March 7, 2022
I am sharing in the challenge in Kylie's International Blog Highlights where the theme is "Thank You", and projects voted in the top 10 go on to participate in Kylie's Winners Highlights Hop later in the month. Don't forget, voting is only open for one week and I would love it if you could pop on over to Kylie's blog to vote for me - I am listed at #27, and while there, vote for your other four favorite cards. Click the below button to head over to Kylie's blog:
I was so inspired by Karen Titus’s Pocket card. I found it fun to use up some patterned paper I had stashed. I loved how easy these were to put together! If you place an order with me this month using the host code Posted to the right I will send you a version of this pocket card!
The pretty pansy’s made the cut too with Soft Succulent, Rich Razzleberry and fresh freesia cardstock, matching the Fresh Freesia and Pale Papaya ribbon
I cut out some pansies from the patterned paper for a pop up accent.
This card I used In The Wild patterned paper, Soft Succulent cardstock and ribbon. I fussy cut out the tiger. The sentiment is stamped in soft succulent.
This card I used In good taste and Smoky Slate cardstock with Metallic Mesh ribbon and blushing bride stamp pad.
Measurements to cut:
Patterned paper : 4” x 10 1/4”, score at the top 1” and 5”
Base colored cardstock: 4 1/4” x 5 1/2”
Basic white at 3 3/4” x 5”
Idea Pin on Pinterest
Shop for the products here:
Product List 
Today I am making a fun Bridge Fold card I learned from Karen Titus.
I used Basic White Cardstick, Balmy blue Cardstick, You're A Peach Designer Series Paper, The Dragonfly Bundle, Waves Dies, Pacific Point stamp pad.
Shop with me and receive a free tutorial with your purchase!
Happy Stamping, Suzie
OH, This is my handsome boy, Aiden, He is a rescue Mastiff and a gentle giant. My bestie.

Product List


 Designer Series Paper")
")


Today I am making a fun Bridge Fold card I learned from Karen Titus.
I used Basic White Cardstick, Balmy blue Cardstick, You're A Peach Designer Series Paper, The Dragonfly Bundle, Waves Dies, Pacific Point stamp pad.
Shop with me and receive a free tutorial with your purchase!
Happy Stamping, Suzie
OH, This is my handsome boy, Aiden, He is a rescue Mastiff and a gentle giant. My bestie.
Product List
Subscribe to:
Posts (Atom)


