
 Specialty Paper")
I created this princess’s dress to create Frozen theme birthday card for my great niece on her 4th birthday
She is a diehard Elsa and Anna fan.
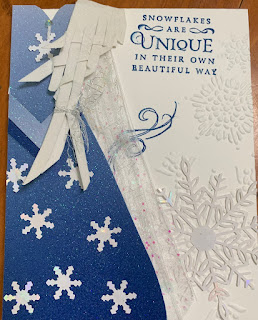
I cut the shape of her dress with my snips, added some thin triangle strips to creat her waist and added the snowflakes. The braid was cut from white felt paper and folded to resemble her hair. I embossed the front of the card with snowflakes, added snowflakes to her dress and shear ribbon for her vail. Then I attached the foil snowflake. Stamped the sentiments in Pacific Point.
For these products shop my store, if your looking for a demonstrator I would Love too help you with your creativity. Thank you for stopping by.
Product List


I created this princess’s dress to create Frozen theme birthday card for my great niece on her 4th birthday
She is a diehard Elsa and Anna fan.
I cut the shape of her dress with my snips, added some thin triangle strips to creat her waist and added the snowflakes. The braid was cut from white felt paper and folded to resemble her hair. I embossed the front of the card with snowflakes, added snowflakes to her dress and shear ribbon for her vail. Then I attached the foil snowflake. Stamped the sentiments in Pacific Point.
For these products shop my store, if your looking for a demonstrator I would Love too help you with your creativity. Thank you for stopping by.
Product List

A great idea I received from Selene Swiridowsky Kempton to create a project display using a smaller tri-fold foam board. I trimmed and attached Stampin’ Up’s clear sleeve envelopes with Stampin’ Seal so I could easily swap out the cards. Took a photo copy of the stamp case inserts and added the die cuts and punch pieces. Now to go and grab more tri-folds to showcase more of my favorite items.
Coming soon, showcasing the All Together Suite Item 160941 currently on low inventory. Order today! (Great option to put in your Starter Kit plus two FREE stamp sets during Sale-a-bration & FREE shipping!) Suite is $105 add some cardstock, ink, maybe some adhesives and spend less to get more by purchasing the starter kit! Let’s talk Starter Kit & craft together!
Starter Kit Info: https://suziejewell.stampinup.net
Let’s Set Sail on New Horizons
I love how these two pair together and create this sailing regatta
I used the coordinating colors in the designer series paper on the sailboats
And I may have gotten over zealous with the birds in the sky
I had the pleasure to practice demoing this card on Facebook live for our Linked by Ink team

Project Recipe:
Cut basic white card base 8 1/2 x 5 1/2 and score at 4 1/4. Cut new horizons paper 4 1/4 x 5 1/2
Use 3”x4” basic white scrap and punch a sail boat template with the sailboat punch. This template is used to line up sailboat stamps on the Stamparatus. Use the template to line up the stamps so you can punch them out after stamping them, mark where to place your basic white scrap. Place the sailboat base using the template to line them up on the left plate and the sails on the top plate so you can stamp many times in different colors.
Stamp the boat 3 times in cinnamon cider and the sails in misty moonlight, calypso coral and fresh freesia onto the basic white scrap .
Punch out the sail boats
Stamp the Long Beach in crumb cake on the bottom of the DSP
Stamp the sentiment and the birds in black momento onto the DSP, make sure to stamp around where the boats will be placed.
Use a little tiny bit of liquid glue on the tips of the sails and adhere them to the boat.
Adhere the boat and the sails with mini dimensionals
If your looking for a demonstrator, Shop With Me here
")
 Designer Series Paper")


Let’s Set Sail on New Horizons
I love how these two pair together and create this sailing regatta
I used the coordinating colors in the designer series paper on the sailboats
And I may have gotten over zealous with the birds in the sky
I had the pleasure to practice demoing this card on Facebook live for our Linked by Ink team
Project Recipe:
Cut basic white card base 8 1/2 x 5 1/2 and score at 4 1/4. Cut new horizons paper 4 1/4 x 5 1/2
Use 3”x4” basic white scrap and punch a sail boat template with the sailboat punch. This template is used to line up sailboat stamps on the Stamparatus. Use the template to line up the stamps so you can punch them out after stamping them, mark where to place your basic white scrap. Place the sailboat base using the template to line them up on the left plate and the sails on the top plate so you can stamp many times in different colors.
Stamp the boat 3 times in cinnamon cider and the sails in misty moonlight, calypso coral and fresh freesia onto the basic white scrap .
Punch out the sail boats
Stamp the Long Beach in crumb cake on the bottom of the DSP
Stamp the sentiment and the birds in black momento onto the DSP, make sure to stamp around where the boats will be placed.
Use a little tiny bit of liquid glue on the tips of the sails and adhere them to the boat.
Adhere the boat and the sails with mini dimensionals
If your looking for a demonstrator, Shop With Me here
When I saw this gorgeous Designer Series Paper I fell in love. The scenery is so fantastic and it reminds me of my backyard. Then I saw this framed wall art in the catalog and I knew I had to create it.
It wasn’t easy to understand but I found some older shadow box frame videos and it all came together.


Project Recipe:
Stamp versa mark on evening evergreen piece, cover in white embossing powder and heat with your heat tool
Die cut the sentiment, the trees and the grass out of the evening evergreen and the Pickett fences from the basic white scrap.
Cut the base for the inside of the frame 7” x 7”
Score In good taste 12 x 12 Designer series Paper at 1/2”, 1”, 1 1/2”, 2” on all four sides. Score 2 1/2 “ in 1” on 2 opposing sides then cut two sides up 2 and diagonal over to make the angle. To understand this diagonal cut watch the tutorial video.
Burnish all the score lines on the frame and adhere the two sides of the frame not cut diagonally with tear and tape making sure they fold in square.
Adhere the last 2 sides putting tear and tape also on the corners so they stick well, making sure they fold in squarely. This is also easier to understand watching the video tutorial.
Adhere the white base to the inside of the frame.
Adhere with liquid glue the trees,grass, & fence keeping the middle of the fences curled up to give dimension.
Adhere the sentiment piece using dimensionals
Adhere the pebble gems around the fences
Adhere the 6x6 New Horizons rolling hills DSP to the inside of the center of the frame
")


When I saw this gorgeous Designer Series Paper I fell in love. The scenery is so fantastic and it reminds me of my backyard. Then I saw this framed wall art in the catalog and I knew I had to create it.
It wasn’t easy to understand but I found some older shadow box frame videos and it all came together.
Project Recipe:
Stamp versa mark on evening evergreen piece, cover in white embossing powder and heat with your heat tool
Die cut the sentiment, the trees and the grass out of the evening evergreen and the Pickett fences from the basic white scrap.
Cut the base for the inside of the frame 7” x 7”
Score In good taste 12 x 12 Designer series Paper at 1/2”, 1”, 1 1/2”, 2” on all four sides. Score 2 1/2 “ in 1” on 2 opposing sides then cut two sides up 2 and diagonal over to make the angle. To understand this diagonal cut watch the tutorial video.
Burnish all the score lines on the frame and adhere the two sides of the frame not cut diagonally with tear and tape making sure they fold in square.
Adhere the last 2 sides putting tear and tape also on the corners so they stick well, making sure they fold in squarely. This is also easier to understand watching the video tutorial.
Adhere the white base to the inside of the frame.
Adhere with liquid glue the trees,grass, & fence keeping the middle of the fences curled up to give dimension.
Adhere the sentiment piece using dimensionals
Adhere the pebble gems around the fences
Adhere the 6x6 New Horizons rolling hills DSP to the inside of the center of the frame
Subscribe to:
Posts (Atom)
Sign up for my Newsletter

Sign up for my Newsletter
Annual Catalog 2024-2025

Who is Suzie Jewell?

Click the photo to find out more

